

I chose UNetLab as the platform for the CCNA and Beyond study guide, as this is one of the better ways to carry you forward as a network engineer. It is free, very flexible, and the number of devices that it can run is very wide. Therefore it makes sense to start using this early in your career.

If you use a proxy to access the Internet, then enter it here, or else, just press return:

At this point the settings will be saved, and the VM will reboot.
At the moment, I cannot access UNL from my browser, and I need to change the network settings within VMWare Fusion. If you are having the same issues, shut down the vm, first by logging in (root/unl), and then using the command "init 0":

Notice the warning error, this is because the virtualization option (above) was not ticked. Now, in Fusion, I can change the network adapter to be shared with my MAC:
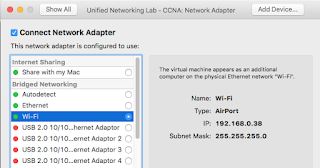
This will give me a different IP address - note how I had a 172.16.250.133 IP address, and now I have 192.168.1.112, also as I have ticked the enable virtualization box, the warning message has disappeared:

I can also access UNL via my web-browser. The first time it loads you will see the Privacy Policy, click accept:

Login with a user name of "admin" and the password "unl":

The first screen you will see looks like this:

Before we can run our labs, we need to get the images, and a small configuration files loaded on to our VM.

Then double click on the new folder to go into it:





Once these are imported, they should appear on the screen:


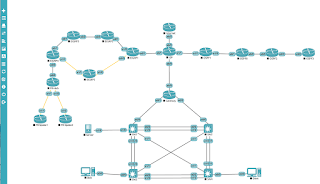


You should now be able to click on the node, and see your telnet program come up:
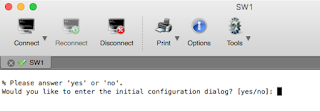
Some useful links for connectivity are below:
Wireshark and Mac OSX
The updated file from the above post
Wireshark and Windows
Now you should be all prepared to get started!
If for any reason you cannot run UNetLab locally, then head on over to www.unlcloud.com, and try it out there!
Please do not support unlcloud.com or eve-cloud.com.
That said, it does require a little time spent on it to get it running, but if you spend the time now, you'll reap the rewards quickly.
In this post we will download UNetLab and set it up on VMWare, then we will find and download the images we need, upload them into UNetLab, find the script to run the images, then download the labs we need, upload them into UNetLab, and finally start the devices and connect to them via Telnet.
I'll be running this on a MAC, but the steps are the same (barring the VMWare install) on a PC.
Update:
I have now posted the video to YouTube. It is better to watch on YouTube though...
Update:
I have now posted the video to YouTube. It is better to watch on YouTube though...
Prerequisites
We have some prerequisites. I won't cover how to install them here, but they are very simple.
VMWare
VMWare Fusion (for MAC): http://www.vmware.com/uk/products/fusion/
Filezilla
This is for uploading the images needed.
Downloading UNetLab
We download UNetLab from http://www.unetlab.com/download/index.html. I prefer the Google Drive link. It is a 534Mb file.
The download is an OVA image, reading for importing into VMWare.
Importing into VMWare
Although I am using VMWare Fusion (for MAC), the steps are pretty similar for VMWare Player (on a PC).
Once you have installed VMWare, select the option to create a new virtual machine.

The select the option to import a new virtual machine, and click "Continue":

Select "Choose File..."

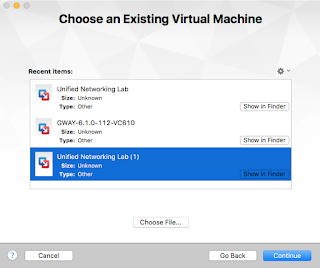
Select the file you just downloaded, and click on Open. It should now be listed:
Once you have installed VMWare, select the option to create a new virtual machine.

The select the option to import a new virtual machine, and click "Continue":

Select "Choose File..."

Select the file you just downloaded, and click on Open. It should now be listed:

Click on "Continue", and then save it:

Accept the license agreement:

The machine will start to be imported:

Once the import has finished, you'll need to edit the settings, to give the virtual machine more memory:

1GB of memory will not be enough to run everything. 8GB is a decent amount of memory. So click on "Customize Settings", and change the memory, and the number of cores, if you can:

It is important that we be able to run our images, so we need to enable virtualization within the VM, so click on Advanced options and make sure that "Enable hypervisor applications in this virtual machine" is ticked. If this is not ticked then you will see the warning "WARNING: neither Intel VT-x or AMD-V found".

Now we can start the VM up. So click on the big start icon!

Accept the license agreement:

The machine will start to be imported:

Once the import has finished, you'll need to edit the settings, to give the virtual machine more memory:

1GB of memory will not be enough to run everything. 8GB is a decent amount of memory. So click on "Customize Settings", and change the memory, and the number of cores, if you can:

It is important that we be able to run our images, so we need to enable virtualization within the VM, so click on Advanced options and make sure that "Enable hypervisor applications in this virtual machine" is ticked. If this is not ticked then you will see the warning "WARNING: neither Intel VT-x or AMD-V found".

Now we can start the VM up. So click on the big start icon!
Initial UNetLab setup
On the first boot, we need to run through a couple of settings.
You should see a screen similar to this, after the initial loading screen. If you don't then press return on the keyboard and it should appear:

Login using the username "root" and password of "unl".
First of all we need to enter the root password, so type in "unl" (without quotes), and once again to confirm.
We then need to type in the hostname, just press return here:

Press return to accept the DNS domain name:

You can either assign an IP address, or leave it on DHCP. I am leaving it on DHCP:

You can add in an NTP server, or leave it blank and press return:You should see a screen similar to this, after the initial loading screen. If you don't then press return on the keyboard and it should appear:

Login using the username "root" and password of "unl".
First of all we need to enter the root password, so type in "unl" (without quotes), and once again to confirm.
We then need to type in the hostname, just press return here:

Press return to accept the DNS domain name:

You can either assign an IP address, or leave it on DHCP. I am leaving it on DHCP:


If you use a proxy to access the Internet, then enter it here, or else, just press return:

At this point the settings will be saved, and the VM will reboot.
At the moment, I cannot access UNL from my browser, and I need to change the network settings within VMWare Fusion. If you are having the same issues, shut down the vm, first by logging in (root/unl), and then using the command "init 0":

Notice the warning error, this is because the virtualization option (above) was not ticked. Now, in Fusion, I can change the network adapter to be shared with my MAC:

This will give me a different IP address - note how I had a 172.16.250.133 IP address, and now I have 192.168.1.112, also as I have ticked the enable virtualization box, the warning message has disappeared:

I can also access UNL via my web-browser. The first time it loads you will see the Privacy Policy, click accept:

Login with a user name of "admin" and the password "unl":

The first screen you will see looks like this:

Before we can run our labs, we need to get the images, and a small configuration files loaded on to our VM.
Finding the IOL images
The images used in the book are:
Routers: L3-ADVENTERPRISEK9-M-15.4-2T.bin
Switches: L2-UPK9-M-15.0-20120621.bin
If you paste these filenames into your browser, then it is easy to find the files needed. Do be careful when downloading.
The downside to virtualization (and the same is true with GNS3) is that because these images are somewhat of a grey area, in terms if licensing (IOU/IOL images are not supposed to be used outside of Cisco), I cannot put links here. I did find most of my images in a file called "ciouL2L3lnximg.7z", and there is a good pre-built UNL VM out there, if you search for "New UNL Lite VM", this can save you a lot of hassle.
Once you have found the images you need, these need to be copied across to the UNL VM.
This is where FileZilla comes in handy:
We need to connect to the UNL VM, using the IP address, username "root", password "unl" and port number 22:
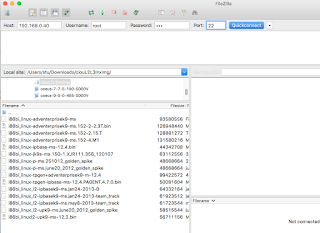
The .bin files need to go in a folder called "opt/unetlab/addons/iol/bin":

So select them all in the left-hand window, and drag them over to that folder:

The files must have a .bin suffix though, so rename them so they look like this, note that the two files I need are at the bottom:

The next part is for us to be able to run these files.
If you are using the prebuilt (Lite) VM, then you are already good to go, and don't need to do anything else. If you are starting from scratch, then we need another file. So using PuTTY, or another SSH client, SSH onto the VM, using the username of "root" and password "unl":
From UNetLab we can import this file using the command
The downside to virtualization (and the same is true with GNS3) is that because these images are somewhat of a grey area, in terms if licensing (IOU/IOL images are not supposed to be used outside of Cisco), I cannot put links here. I did find most of my images in a file called "ciouL2L3lnximg.7z", and there is a good pre-built UNL VM out there, if you search for "New UNL Lite VM", this can save you a lot of hassle.
Once you have found the images you need, these need to be copied across to the UNL VM.
This is where FileZilla comes in handy:
We need to connect to the UNL VM, using the IP address, username "root", password "unl" and port number 22:

The .bin files need to go in a folder called "opt/unetlab/addons/iol/bin":

So select them all in the left-hand window, and drag them over to that folder:

The files must have a .bin suffix though, so rename them so they look like this, note that the two files I need are at the bottom:

The next part is for us to be able to run these files.
If you are using the prebuilt (Lite) VM, then you are already good to go, and don't need to do anything else. If you are starting from scratch, then we need another file. So using PuTTY, or another SSH client, SSH onto the VM, using the username of "root" and password "unl":
Stuarts-iMac:~ stu$ ssh root@192.168.0.40
The authenticity of host '192.168.0.40 (192.168.0.40)' can't be established.
ECDSA key fingerprint is SHA256:vwx1StMGWi6jH9tLxJbDQbP3f3SXubHn+VZJbJ6QrFA.
Are you sure you want to continue connecting (yes/no)? yes
Warning: Permanently added '192.168.0.40' (ECDSA) to the list of known hosts.
root@192.168.0.40's password:
Welcome to Ubuntu 14.04.2 LTS (GNU/Linux 3.16.7-ckt8-unetlab x86_64)

 * Documentation:  https://help.ubuntu.com/
Last login: Fri Jan 29 11:36:03 2016
root@unl01:~#
First we need to run a command "/opt/unetlab/wrappers/unl_wrapper -a fixpermissions":
root@unl01:~# /opt/unetlab/wrappers/unl_wrapper -a fixpermissions
root@unl01:~#
Next, we need a file to allow us to run the IOL images.
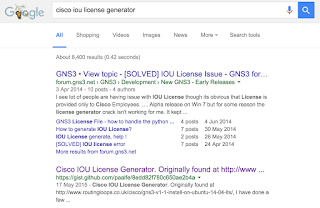
The easiest way to do this is to do a search for "Cisco IOU License Generator", and here is a link to the search: https://www.google.co.uk/search?q=cisco+iou+license+generator. The second result looks good:

wget https://gist.githubusercontent.com/paalfe/8edd82f780c650ae2b4a/raw/bd7b6b8a81c338359e6de4ff0ed0def9f7dc9146/CiscoKeyGen.py
Again, this is one reason UNetLab needs a connection to the Internet. The process should look like this:root@unl01:~# wget https://gist.githubusercontent.com/paalfe/8edd82f780c650ae2b4a/raw/bd7b6b8a81c338359e6de4ff0ed0def9f7dc9146/CiscoKeyGen.py
--2016-01-29 12:25:02-- https://gist.githubusercontent.com/paalfe/8edd82f780c650ae2b4a/raw/bd7b6b8a81c338359e6de4ff0ed0def9f7dc9146/CiscoKeyGen.py
Resolving gist.githubusercontent.com (gist.githubusercontent.com)... 185.31.19.133
Connecting to gist.githubusercontent.com (gist.githubusercontent.com)|185.31.19.133|:443... connected.
HTTP request sent, awaiting response... 200 OK
Length: 1608 (1.6K) [text/plain]
Saving to: ‘CiscoKeyGen.py’
100%[=============================================================================>] 1,608 --.-K/s in 0s
2016-01-29 12:25:02 (342 MB/s) - ‘CiscoKeyGen.py’ saved [1608/1608]
root@unl01:~#
We then need to make the files executable, and then run it. We make it executable using the command "chmod +x CiscoKeyGen.py" and run it using ./CiscoKetGen.py: root@unl01:~# chmod +x CiscoKeyGen.py
root@unl01:~# ./CiscoKeyGen.py
*********************************************************************
Cisco IOU License Generator - Kal 2011, python port of 2006 C version
hostid=00802101, hostname=unl01, ioukey=abcdef
*********************************************************************
Create the license file $HOME/.iourc with this command:
echo -e '[license]\nunl01 = abcdefghijklm;' | tee $HOME/.iourc
The command adds the following text to $HOME/.iourc:
[license]
unl01 = abcdefghijklm;
*********************************************************************
Disable the phone home feature with this command:
grep -q -F '127.0.0.1 xml.cisco.com' /etc/hosts || echo '127.0.0.1 xml.cisco.com' | sudo tee -a /etc/hosts
The command adds the following text to /etc/hosts:
127.0.0.1 xml.cisco.com
*********************************************************************
root@unl01:~#
The we can put these two lines into the file we need, so do as I do below: root@unl01:~# echo [license] > /opt/unetlab/addons/iol/bin/iourc
root@unl01:~# echo "unl01 = abcdefghijklm;" >> /opt/unetlab/addons/iol/bin/iourc
The file should look like this: root@unl01:~# cat /opt/unetlab/addons/iol/bin/iourc
[license]
unl01 = abcdefghijklm;
root@unl01:~#
Do note that the output you get should look different. I have changed the license here to something else, follow the steps, but make sure you use the license generated on your system, don't just copy and paste from this site.
We are at the stage where we can import the CCNA and Beyond main lab, and Troubleshooting lab, but before we do that, let's just make sure we are fully up-to-date!
It is probably a good idea to give the VM a reboot now, using the command "init 6". Once it's back up again, we can get our labs loaded.
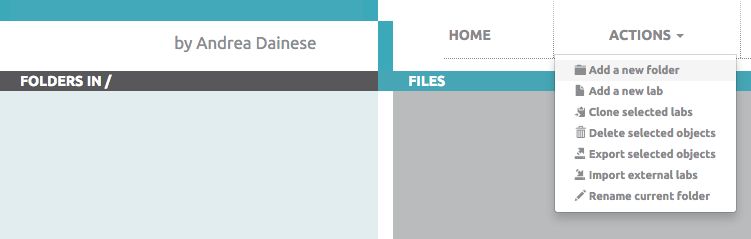
Let's create a folder for our labs, from the Actions menu select "Add a new Folder"

Give the folder a name, like I do below:
Updating UNetLab
Before we do anything we should update UNetLab to the most recent version. We need to run two commands for this, apt-get update, and then apt-get upgrade. I have put a truncated version of this below:root@unl01:~# apt-get update
Get:1 http://www.unetlab.com trusty InRelease [2,677 B]
Get:2 http://www.unetlab.com trusty/rrlabs amd64 Packages [3,013 B]
Get:3 http://www.unetlab.com trusty/rrlabs i386 Packages [29 B]
Ign http://www.unetlab.com trusty/rrlabs Translation-en_US
Ign http://www.unetlab.com trusty/rrlabs Translation-en
Fetched 31.4 MB in 16s (1,916 kB/s)
Reading package lists... Done
root@unl01:~#
root@unl01:~#
root@unl01:~#
root@unl01:~# apt-get upgrade
Reading package lists... Done
Building dependency tree
Reading state information... Done
Calculating upgrade... Done
The following packages have been kept back:
unetlab
The following packages will be upgraded:
94 upgraded, 0 newly installed, 0 to remove and 1 not upgraded.
Need to get 66.2 MB of archives.
After this operation, 330 kB disk space will be freed.
Do you want to continue? [Y/n] Y
Get:1 http://www.unetlab.com/apt/ trusty/rrlabs unetlab-qemu amd64 0.9.0-66 [27.0 MB]
Get:2 http://us.archive.ubuntu.com/ubuntu/ trusty-updates/main base-files amd64 7.2ubuntu5.3 [60.9 kB]
Get:3 http://us.archive.ubuntu.com/ubuntu/ trusty-updates/main coreutils amd64 8.21-1ubuntu5.3 [1,090 kB]
Get:4 http://us.archive.ubuntu.com/ubuntu/ trusty-updates/main dpkg amd64 1.17.5ubuntu5.5 [1,953 kB]
Fetched 66.2 MB in 18s (3,620 kB/s)
Extracting templates from packages: 100%
Preconfiguring packages ...
(Reading database ... 50278 files and directories currently installed.)
Preparing to unpack .../base-files_7.2ubuntu5.3_amd64.deb ...
Unpacking base-files (7.2ubuntu5.3) over (7.2ubuntu5.2) ...
Setting up base-files (7.2ubuntu5.3) ...
Configuration file '/etc/issue'
==> Modified (by you or by a script) since installation.
==> Package distributor has shipped an updated version.
What would you like to do about it ? Your options are:
Y or I : install the package maintainer's version
N or O : keep your currently-installed version
D : show the differences between the versions
Z : start a shell to examine the situation
The default action is to keep your current version.
*** issue (Y/I/N/O/D/Z) [default=N] ?
Installing new version of config file /etc/issue.net ...
Installing new version of config file /etc/lsb-release ...
Installing new version of config file /etc/os-release ...
apache2_invoke php5: already enabled
* Restarting web server apache2 [ OK ]
Setting up unetlab-qemu (0.9.0-66) ...
Setting up openvswitch-switch (2.0.2-0ubuntu0.14.04.3) ...
Installing new version of config file /etc/init/openvswitch-switch.conf ...
openvswitch-switch stop/waiting
openvswitch-switch start/running
root@unl01:~#
Notice how the above commands said that it was keeping UNetLab back? Well, we can update it using the following:root@unl01:~# apt-get install unetlab
Reading package lists... Done
Building dependency tree
Reading state information... Done
The following extra packages will be installed:
genisoimage libaio1 unetlab-qemu unetlab-vpcs
Suggested packages:
wodim cdrkit-doc
The following NEW packages will be installed:
genisoimage libaio1 unetlab-vpcs
The following packages will be upgraded:
unetlab unetlab-qemu
2 upgraded, 3 newly installed, 0 to remove and 0 not upgraded.
Need to get 37.8 MB of archives.
After this operation, 1,633 kB of additional disk space will be used.
Do you want to continue? [Y/n] Y
Importing labs into UNetLab
Give the folder a name, like I do below:

Then double click on the new folder to go into it:

From the downloads menu on this website, download both the Configuration and Troubleshooting UNL files from the Book Resources sub-menu.
These will come down as zip files. Do not extract the zip files. Alternatively, they are available within the Forum section on the website:

Then from the Actions menu, select "Import externals labs" and import both the files:

Select the Main lab,

Click on OK, and then click on Import:

Repeat this again, selecting the Troubleshooting lab:


To open a lab, double-click on it, and select Open:

You should see a page a little like this:

It is worth spending a moment to make sure that the correct images are being used. Click on the third icon from the top on the left hand side menu, it will bring up the Nodes windows:

Just have a quick check to make sure that we have the right images, as below:

Now you can right click on a device, and select start, or, from the Actions menu, select "Start all nodes":

The node should then change, instead of having a black square, it should have a black triangle, you should also see a notification in green on the top right hand side:


Some useful links for connectivity are below:
Wireshark and Mac OSX
The updated file from the above post
Wireshark and Windows
Now you should be all prepared to get started!
Please do not support unlcloud.com or eve-cloud.com.